The precedents have been designed to be used within the LEAP legal software environment, with matter details automatically filling fields in precedents.
Without the automation this can mean a precedent will sometimes look a little odd, with spaces replacing matter details.
We strongly recommend that users consider the first two items in the index which are:
- Show fields in the precedents Alt +F9;
- Reveal the fields in a precedent with shading.
Note: All instructions are based on Word 2007 unless otherwise noted. Click on any image to view better.
Show fields in the precedent
Alt+F9 shows any fields within a precedent.Show fields in the precedent
Assuming field shading has been turned on:
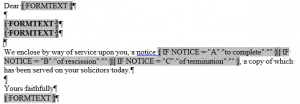
Without Alt + F9
With Alt+F9
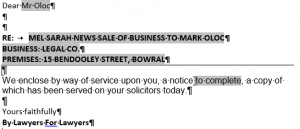
By way of background, here is the same letter as it would appear when opened in LEAP, with matter details automatically populating the precedent:
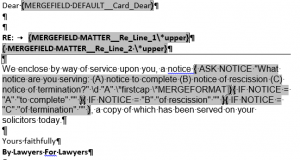
And the same letter in LEAP with the LEAP field codes that populate the letter visible (Alt+F9):
Reveal the fields in a precedent with shading
Form field shading shows a user where to insert information by shading the form text fields – for instance, {FORMTEXT}.
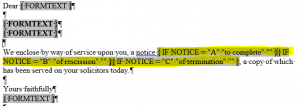
Field shading reveals additional field information to assist the user to insert relevant information – see the highlighted text below:
Below is a precedent with no field shading or field codes displayed:
Turn on form field shading
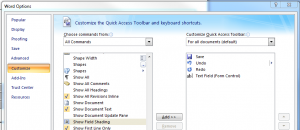
To easily access form field shading, add it to the Quick Access Toolbar (top left corner of Word). Select More Commands on the Customise Quick Access Toolbar drop down menu:
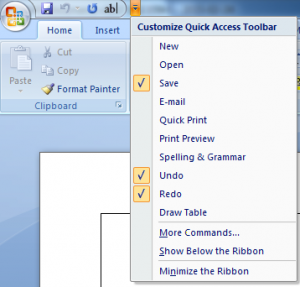
From the Choose commands from dropdown box, select All Commands. Select Show Field Shading and Add to the right panel.
This method can be used to add any of the Word functions to the Quick Access Toolbar.
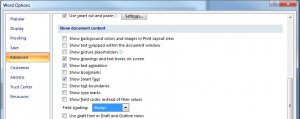
Turn on field shading
- Click the Office button in the top left-hand corner. Click Word Options at the bottom. (For Word 2013 go to File > Options.)
- Click Advanced on the left.
- Go to Show document content.
- Under Field Shading select Always.
Insert a line under a heading
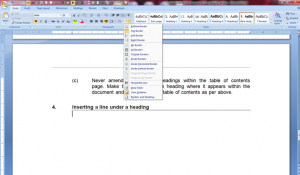
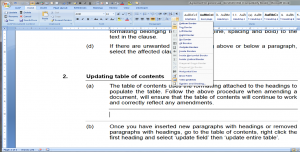
To inset a heading line under a new heading, create the new heading with the desired list formatting applied and place the curser directly underneath the heading. Use the border button on the Home ribbon to select the top border by clicking on it once.
Insert a new clause
To insert a clause select and copy the clause above, along with its heading, and paste it into the white space between existing clauses. This will bring with it the style applied to the clause and any associated numbering or bullets. Then simply change the heading and the content of the clause.
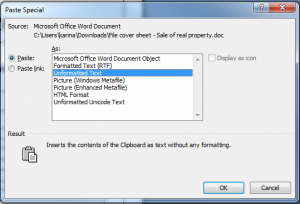
If pasting content from an external source such as another word document or an internet page, select ‘paste special’ from the home ribbon or menu (or Alt+Ctrl+V) and then ‘unformatted text’.
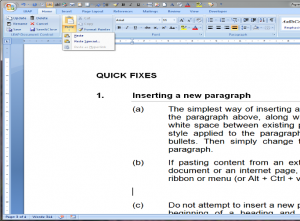
Do not attempt to insert a new paragraph by placing the cursor at the beginning of a heading and entering down. This will apply the formatting belonging to the heading (line, spacing and bold) to the text in the clause.
Remove unwanted lines above or below a paragraph
If there are unwanted lines appearing above or below a paragraph, place the cursor above or below the affected lines and use the border button on the Home ribbon to unselect any applied borders by clicking on them once. It may be necessary to repeat this step more than once depending on the number of border lines appearing.
Formatting marks – The pilcrow – SHOW/HIDE
The pilcrow – found on the Home ribbon – shows paragraphs and other hidden formatting symbols such as spaces, tab marks, page and section breaks.
To control what formatting marks are shown:
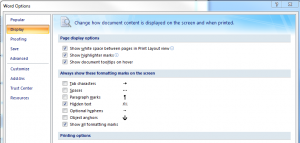
- Click the Office button in the top left-hand corner. Click Word Options at the bottom. (For Word 2013 go to File > Options.)
- Select Display.
- Select which marks should be displayed under Always show these formatting marks on the screen.
Headers and footers
To control what formatting marks are shown:
- Click the Office button in the top left-hand corner. Click Word Options at the bottom. (For Word 2013 go to File > Options.)
- Select Display.
- Select which marks should be displayed under Always show these formatting marks on the screen.
Accessed from the Insert ribbon:
What you do with headers and footers depends on your preference. You can:
- Choose from many predefined formats.
- Make the first page different from the rest.
- Make the header or footer different in each section.
- Edit the contents.
- Insert a page number.
- Insert the document title.
- Insert the date.
- Remove them.
Double-click in the top or bottom margin to instantly access headers and footers
and the Design ribbon.
The obvious choices are visible.
- Predefined formats are accessed from the Header and Footer
- Page Number contains the location and format options.
- Date & Time contains the various formats.
- Quick Parts is for the advanced user.
- Picture and Clip Art insert images.
- The rest are all related to movement between and the relationship between the headers and footers on each page.
Points to consider for headers and footers
- The usual formatting applies in the headers and footers e.g. alignment, font size, colour.
- They show faintly and print in normal resolution.
- Good for text to stay put out of the way and for repeated text.
Keep text or paragraphs together
- Use Keep with next to keep a heading attached to a paragraph.
- Use Keep lines together to ensure a paragraph does not go across the page.
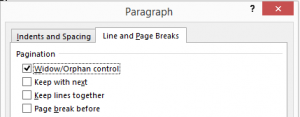
- Use Widow/orphan control to stop the first line of a paragraph appearing at the bottom of a page (orphan) or the last of a paragraph from appearing at the top of a page (widow). It is on my default.
To control placement of page breaks:
- Select the paragraphs you want to adjust.
- On the Home ribbon clickParagraph, and then click the Line and Paragraph Breaks
- Then check the appropriate box. Note: Window/orphan control is checked by default.
Note: If either Keep with next or Keep lines together is checked, a black square will appear in the left margin.
Moving through a form
Lawyers use many forms in the day to day running of their matters. It is useful to understand how to easily navigate through them.
Most forms
Most forms which have fields embedded within them can be navigated electronically using the F11 key or the Tab key – virtually ‘hopping’ from one field to the next. The reverse direction is achieved by using the Shift key: Shift+F11
If you want to hard text a field’s entry in a form or precedent you select the field and press Ctrl+Shift+F9 altogether.
Locked forms
There are some forms which are ‘locked’ by the issuer eg the NSW real property lease form. The issuer locks these forms so that the layout and form wording is maintained.
To navigate through these forms use the Tab key.
The reverse direction is achieved by using the Shift key: Shift+Tab.
Check a box
To check a box with your keyboard use the Spacebar.
Table of contents – update
If any headings have been added or removed, the table of contents will need to be updated:
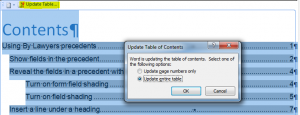
- Click anywhere within the table of contents to show the Update table
- Select Update entire table > OK.
Never amend the name of headings within the table of contents page. Make the change to the heading where it appears within the document and then update the table of contents as per above.


